

 Shearwater Kaftan by Make It Perfect
Sizes: X-Small to X Large
Bust measurement: XS: 86 cm (34") - XL: 106.5 cm (42.6")
Cost: AUD $17.50
Description from package:
Brighten up your wardrobe with a sensational Shearwater Kaftan. Wish just the right balance between floaty and fitted and featuring lovely front placket detail in a choice of two lengths, the Shearwater Kaftan is comfortable, flattering and practical. Throw it on over a pair of swimmers and shorts, wear it with a summer skirt or dress up a pair of jeans - the possibilities are endless...

For a light cotton tunic coverall this looks fairly straight forward. And I certainly want to look as happy and thin as the model in the photograph! One can dream about waistlines... That said, I love a throw over shirt that I can wear on warm days over a swim suit or just over a tank top on cool sprint or autumn days. Especially when I just feel like a nice loose shirt!
Straight away after looking at reviews of this pattern on patternreview.com I found another woman of my measurements who gave up on this pattern because it was too tight around the bust. What the line diagram does not show is that 3 inches below the arm scythe on the side seam is the THINNEST part of the body! Who in the world is smaller around their bust line than around their waist I ask you!!
Already I can see some required adjustments after measuring the pattern:
1. Increase bust line measurement on pattern. Drop side seam line straight down from end of arm scythe point to waist. XL size with 42.6 inches means 42.6 inches. There is no EASE built into this pattern. After measuring the front and back at bust line taking away the miniscule seam allowance built in, I have an exact measurement of 42 inches at the bust line. And at 42 inches with a minimiser bra, as is will not work for me. As the pattern side seam literally curves in AT the bust line, I will simply draw a straight line from the end of the arm scythe point of side seam straight down to the waist line on the front and back piece, that builds back in 2 cm at each side seam x 4 = 8 cm (3.2 inches) added in to make a new bust line measurement of 45 inches = perfect 3 inch ease.
After first Test Muslin:
A. Bust line is still just a tad tight, speed bumps can still be seen.
B. Cannot lift my arms - the area between upper arm scythe in back measures 14 inches without seam allowance - I need a minimum of 16 inches.
C. Sleeve bicep area might be a tad snug.
Second Test Muslin Adjustments:
2. Added 1 inch Front Bust Adjustment complete with side darts and everything to front piece. Keeping the original side seam movement of adjustment 1 in place. My favourite tutorial is from the blog Sew L.A.
After trying on I found:
Adjustment 2. FBA was totally unnecessary. Front is now WAY too big.
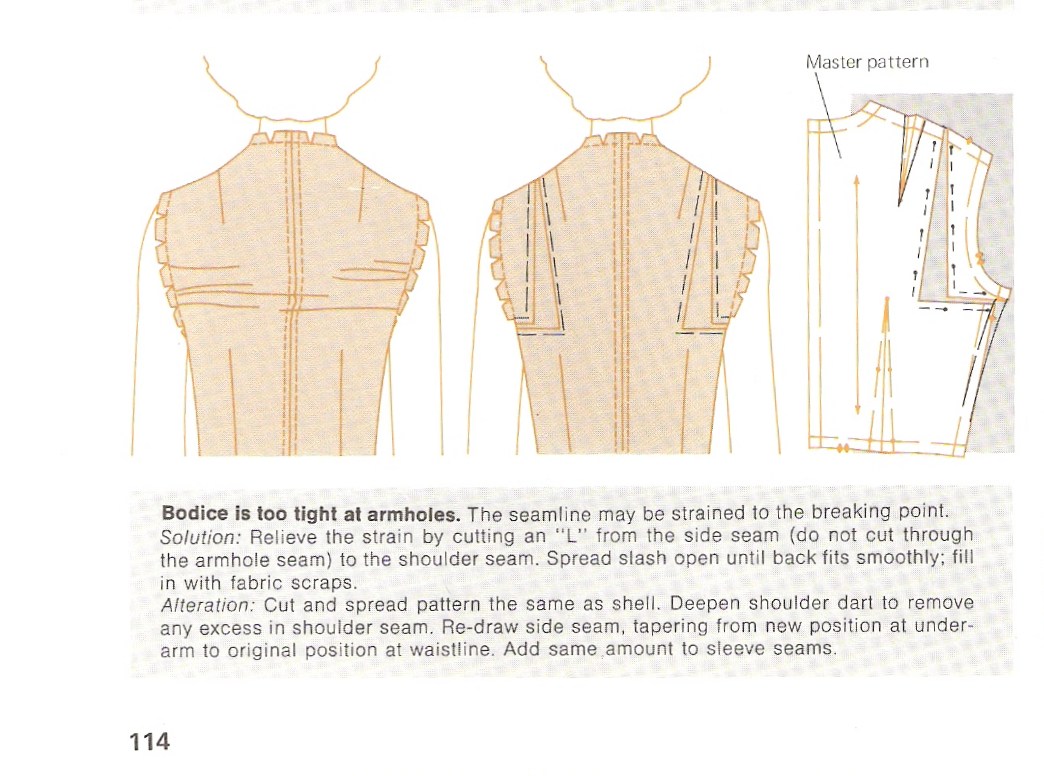
Adjustment 3 Broad back was good, but I still find it difficult to raise my arms up over my head comfortably. Is it an issue? Yes, I would like to increase the Pivotal spread to 1.5 inches. This should give me enough ease in the back.

On a whim, I sewed my first test muslin front with only bust line adjustment 1. to the Second Test Muslin back with the pivotal Broad Back adjustment 3. with original sleeves. This gives a great fit around the bust line (as that broad back adjustment also introduces more ease which affects the bust line), waist and hips now. The back area between the shoulder blades is still just a little snug but does measure exactly 16 inches w/o seam allowance. The sleeve bicep area is still pulling a bit tight when I reach forward, but I suspect it is more to do with a tight back piece rather than too small sleeve area.
Second Test Conclusions:
- Make final pattern front with side seams adjustment 1 in place, otherwise as is on original pattern. Lengthen by 3 inches.
- Make final pattern back piece with side seam adjustments 1 in place AND a 1.5 inch Pivotal Broad Back Adjustment. Add 1 inch to length.
- Sew in test muslin sleeves after all this is achieved to see if the sleeve bicep area is still an issue before cutting good fabric.
- Original front facing piece way too small. Made a 4 inch large piece based on front piece that is 8 inches deep. When slit in front falls open, only the contrasting front facing fabric should be seen - not the edges of the facing!
- Cut bias tape, front facing and sleeve fold tabs in contrasting fabric.
If I make this shirt again, I will close the neck line hole a bit to make it smaller.

No comments:
Post a Comment